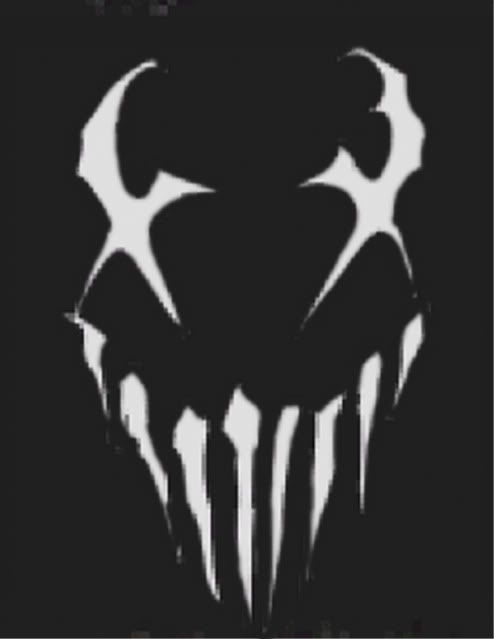
I'm a fan, as is my boyfriend, and he requested a hat with the logo. Seeing as I couldn't find anything on ravelry that resembled closely, I created my own pattern and winged it.
Though this is the band logo, I noticed it's a really great hat for a teenage boy who loves his rock music or a man who just likes interesting things. It's very versatile, and can even be worn by women. I know I love it! You'll find the pattern below, and this is a great first time pattern for someone who wants to read a chart. It's really not as hard as it looks.

NOTE: Beginning chart readers scroll down for info on how to read the chart--->
GAUGE: 6sts and 6 rows= 1"
YOU WILL NEED:
2 skeins of your choice, different colors that meet the gauge. (I used Lion Brand Wool Ease)
A darning needle
Sz. 7 16" circulars
Sz. 7 DPNs
A stitch marker.
TERMINOLOGY:
K: Knit
K2TOG: Knit 2 Together
st(s): stitches
CO: cast on
BO: Bind Off
PM: place marker
DIRECTIONS:
CO 80 sts.
Join for working in the round.
Place Marker at beginning of row.
Proceed knitting with the main color, following the chart until chart signals your other color.
Once chart is finished, start decreasing by 7:
*K7, K2TOG* repeat from *
*K6, K2TOG* repeat from *
And so on...
When you finish with the final "K2TOG", you should have some stitches remaining. Using your darning needle, cast off and bind them tightly.
Proceed to weave and tie off your contrasting color. :)
Block, if you desire.
Wear with pride!
This hat is a bit longer than regular hats for warmth during the winter. You may cast off earlier if you so wish, depending on the size of the person's head and what not.
To access the chart, save this photo to your computer, then proceed to this site and enter the photo in the grid builder. Simple. :)
HOW TO READ A BASIC KNITTING CHART
There are quite a few different charts, and oftentimes they look rather scary. I've noticed that the rows and numbers chart is the easiest one for me to read. This hat, though my own design, was also a great first time chart pattern. I was really nervous about doing this, Lord knows knitting without a chart is a task enough. But this is really easy.
On the chart I provided you, the numbers along the bottom of the page are the stitch numbers, and represent (depending on the color yarn using) when to switch the color yarn to create the pattern.
The numbers along the left hand side going up are the rows. Those signify what row you are on, and also show where the color changes for the pattern.
The blocked sort of pattern shows each individual stitch.
Simple enough, right?
So, for instance: on row 4, stitch number 22 would be an alternating color from the main one you are using.


