Do you think people should knit items for their pets (dogs, cats, smaller animals)?

Sunday, December 27, 2009

Simple and Efficient Yet Lovely Coffee Cup Cozy

There are so many cup cozies out there with nice patterns, but I found a love of simple and beautiful projects. Sometimes all you need is the right mug, and a garter stitched cozy to make something extraordinary. That's what this is.

Photobucket

In a span of a day consumed with cleaning, errands, pets, and utter insanity, I managed to get this knit over a few hours span. It's a quick, easy knit.

Gauge: 5 sts and 5 rows= 1x1" on Sz. 9 knitting needles

YOU WILL NEED:

A worsted weight yarn of your choice
Sz. 9 knitting needles
A pretty button

TERMINOLOGY:

CO: Cast On
K: knit
ST(S): stitch(es)

This cozy is created for mugs with a circumference of 12"
Of course, you can always adjust it to fit your mug. ;)

Photobucket

INSTRUCTIONS:

CO 11 sts.
Knit basic garter stitch for five rows.
On the sixth row: K4, Cast Off 4, M4 w/ backward loop method, K to end of row.
**Remember when making your sts you put the last stitch you used to Cast Off back onto your left needle before starting the making of your new replacement sts. This helps create a clean hole instead of leaving a small yarn knitted tightly in the middle of the hole, making the hole unusable.

Photobucket

Continue to knit until the entire piece measures 11".

I didn't knit until the 12" circumference because the yarn can stretch a bit, and I'd rather have a tighter cozy than a loose one so I don't drop the mug!

Bind off, find the placement spot of your button (mine was about a half inch inward of the Cast Off end) and sew it on, and you're done. :)

Photobucket

Thursday, December 10, 2009

Toasty Hot Cocoa Hat

This hat reminds me of a cold snowy winter day, where you just come inside from shoveling or building a snowman and you have a nice cup of cocoa. Plus, I love the color, it reminds me of a milk chocolate bar. :) Another great hat for either a man or a woman. I created this for my boyfriend this Christmas. Hope you enjoy the pattern!

Photobucket

YOU WILL NEED:

Sz. 10 16" circulars.
Sz. 10 DPNs.
1 skein of Red Heart Soft Solids in a color of your choice. The one in the pictures is the skein of "Toast".
Yarn Needle to weave in ends when done.

TERMINOLOGY:
CO: Cast On
K: Knit
P: Purl
K2TOG: Knit 2 Together
St(s):Stitch(es)


THE BRIM:
Cast ON 80 sts.
Very simple, created using Seed Stitch. Seed until the brim measures 2 1/2".

THE BODY:
The body is created using knit and purl sts. I wanted to do another hat pattern that would be simple but to a non knitter would look complcated. ;) Sneaky, right? ;)

You're going to *K3, P1 and repeat from * with every row. Continue the K3, P1 pattern until the hat measures 6", excluding the brim.

DECREASING:

Remember to switch to your DPNs when things start becoming tight. For me, I switch hen I start decreasing at K4, K2TOG.

K7, K2TOG, REPEAT UNTIL END OF ROW.
K6, K2TOG, REPEAT UNTIL END OF ROW.
K5, K2TOG, REPEAT UNTIL END OF ROW.
K4, K2TOG, REPEAT UNTIL END OF ROW.
K3, K2TOG, REPEAT UNTIL END OF ROW.
K2, K2TOG, REPEAT UNTIL END OF ROW.
K1, K2TOG, REPEAT UNTIL END OF ROW.
K2TOG, REPEAT UNTIL END OF ROW.

Bind off, weave in ends. :)

Photobucket

You can continue working in the pattern as you decrease, until about you get to K3, K2TOG, then I recommend continuing with basic stockinette stitch. It creates a clean finish, and doesn't disrupt the pattern much.


Photobucket
Enjoy!

Tuesday, December 1, 2009

She's Got Chic Scarf

I created this pattern a while back, just out of curiosity, and I didn't know I was actually creating something WONDERFUL. It was just an idea, for a scarf, for a friend who wanted something entirely different from the rest of her friends.

So rose this pattern.

It's a perfect pattern for those who want to test their purling and counting. A more seasoned scarf for someone who wants to take a small step from regular knitted scarves, but also lovely enough for one who's knit dozens of scarves in all pattern forms.

YOU WILL NEED:

Size 13 US knitting needles.
Worsted Weight yarn of your choice

This pattern works well with brighter, more full colors. Or even a dark, rich color. Steer clear of colors that hardly show patterns. The pattern is what makes this scarf so unique.

Photobucket

TERMINOLOGY:

CO: Cast Off
P: Purl
K: Knit
STS: Stitches

THE SCARF:

It's simple.

Cast on between 25-30 sts, depending on how large you want it. It's already a large scarf, intended for warmth while looking pretty, it's just up to you on how LARGE you really want it. The picture below I cast on 25 exactly if I remember correctly. I've knit one since with 30, for a more full head coverage, and I loved that as well.

A big part of this project is keeping track of your purling and knitting rows. Keep that in mind as you continue.

Start by knitting 10 rows, and then purling eight.

Continue k10, then p8, then k10, then p8 until the scarf reaches about 6ft long. Of course, if you are shorter than the average person, adjust accordingly. I'm 5'4" and I love the length.

Photobucket

If you notice from the pictures, when you turn into purling, it leaves a lovely little gap between the rows. I love that.

Make sure you cast off on a knitted row! Be sure to take your time while knitting this, and keep track of your knitted and purled rows. I made the mistake of not counting correctly and on my second scarf there was a section that looked like one giant mess. So, slow is wonderous. :)

Photobucket

The Boyfriend Hat

A simple, classic pattern that I created for my boyfriend who wanted a hat but wanted something other than a basic stockinette stitch. I call this the 'boyfriend hat' because it's versatile. Made specifically for men, but can also be worn by women. I loved how this turned out.

Photobucket

YOU WILL NEED:

SZ 7 16" circular needles
SZ 7 DPNs
A yarn color of your choice. (I used Red Heart's Heather Gray. Such a beautiful, both sex color. :) )

TERMINOLOGY:

sts: stitches
CO: cast off
P: purl
K: knit
* : repeat from here.

THE PATTERN:

Cast on 78 sts. I've found this is a good sized hat for a man and even for a women it's a great size, leaving just enough space for our hair and room to breathe!


*P5 K1 and repeat For the first two inches of the hat (or desired length. I loved two inches since it wasn't too low, and wasn't too high.

When the two inches is reached, reverse the pattern and *K5 P1 and repeat until desired length is achieved (base it off your own head, or whoever you're making it for. If that doesn't work, just knit the basic five to six inches. This normally makes it long enough to cover the ears entirely so your ears don't freeze in the witner.)

Photobucket

Fold the two inch brim over, (the reason you P5 K1 for the first two inches is because you will be folding it over, and you want your sts to match, right? :) See pic below. :) )


DECREASING:

Very simple, clean.

M2, this helps with the decrease pattern. (I lost the original pattern and have been improvising until I get another one made!)
K7 K2TOG until end of row.
K6 K2TOG until end of row.
K5 K2TOG until end of row.
K4 K2TOG until end of row.
K3 K2TOG until end of row.
K2 K2TOG until end of row.
K1 K2TOG until end of row.
K2TOG or cast off.

When it gets closer to the top, it gets harder to follow the pattern. I continued with the same pattern I had used while knitting the hat and eventually when I only had a few sts left on my DPNs I just did regular knitting, and you couldn't tell unless you were specifically looking for it!

Photobucket

Thursday, November 26, 2009

Warm Thoughts In The Snow Hat

This pattern was an inventive one to say the least, considering I normally do patterns that other avid knitters have created because I am frightened of wasting perfectly good yarn.
To my amusement, this came out better than I thought it would, so I'm providing the pattern below. Congratulations viewers, this is the first hat pattern I've personally created!

Photobucket

You will need:

Size 10 16" circular needles
Size 10 DPNs
A needle to weave in loose ends and sew the flaps to the hat
scrap yarn of the same or similiar color.
A skein color of your choice in Bernat Boucle.
Two buttons that go well with the yarn.
A sewing needle
Similiar colored sting (to sew the buttons on!)


Terminology


K: knit
CO: Cast Off
M: Make

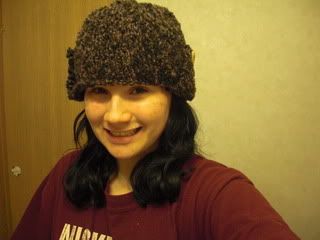
The size of the hat is a large, but fits well on smaller heads. I created this hat originally for my stepfather for Christmas, and he has a larger head (said lovingly) than I do. My head is a medium size, and it fit well, and perfect on his, with room to spare.

Bulkier yarn worked up beautifully with this pattern. I don't think I'd use worsted weight for this hat, seeming as it just wouldn't have the same feel as a bulkier yarn would.

NOTE ABOUT THIS YARN: I really loved using it, but when you tie off, do it gently, as this yarn is one of those beautiful but deadly knitting ones. If you aren't gentle, there's a good possibility that it will rip. I found that tugging gently a few times when finished and then securing it with another piece tied to it works well. Just throwing that out there. :)

THE ACTUAL HAT

To start, cast on 80 sts.

Knit in the basic stockinette stitch in the round for about 4 1/2 to 5 inches. If you're unsure of length, just knit until it just reaches the top of your eyebrows. The stockinette stitch works great with this yarn since it's bulky, and I've found any other stitching with this yarn doesn't look as nice.

Once length is achieved, start decreasing as you would a normal hat. Remember that if the sts become to tight, switch to DPNs! They're a real lifesaver on hats!

K10, K2TOG. Knit till end.
K9, K2TOG. Knit till end.
K8, K2TOG. Knit until.
Continue on...
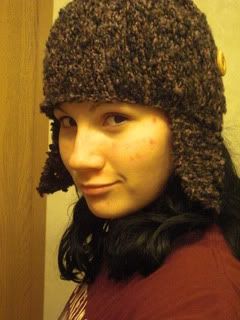
Knit the final two sts remaining together and bind off. You've completed the actual hat part. Set aside and pick up your DPNs once more to start creating the ear flaps.

Photobucket

THE FLAPS

Cast on 14 sts onto a DPN.
Knit 1 row.
On the next row: K1, K2TOG, Knit until the end.
Knit 1 row.
On the next row: K1, K2TOG, Knit until the end.

Continue this pattern of knitting a row, then knitting two together on the next row until you have a remaining total of 10 sts on your DPN.

Once you have 10 remaining, knit for 5 rows.

After you finish knitting five rows, on your next row: K1, K2TOG and knit until the end.

9 sts remaining.

Knit 3 more rows.

After the 3rd row: K3,CO3, M3 with the backwards loop method, then knit until end.

Continue to knit three more rows, and then cast off. There's your ear flap! Do the same for the next flap.
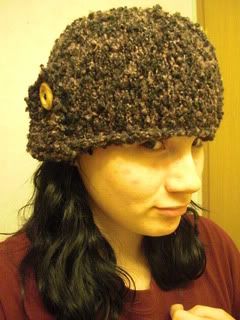
Attaching Flaps and Adding Buttons

Align the flap where you'd like it, take your yarn needle and attach with the same colored yarn, or scrap.

Make sure the button holes are in the front of the hat (meaning that one isn't in the front and the other in the back. This happens when you mismatch which way to put the flap.)

Be careful when aligning the buttons with the button holes, make sure they are even before attaching with regular thread and needle.
A smaller, medium sized button is recommended. I used a basic wooden button with four holes from JoAnn Fabrics.

That's all there is to it! Enjoy your hat!

Any questions, feel free to ask. :)

Photobucket